DIY Artificial Turf Installation —
You Can Install Artificial Turf Yourself.
Here’s How To Do It Right.
Installing artificial turf is a realistic DIY project for most
- No trade licence required
- Most installs take 1–2 weekends
- We’ll help you plan it
- All materials available in Maple Ridge
Before You Start
Is DIY Artificial Turf Installation Right For Your Project?
Most residential artificial turf installs in
That said, some projects are more complex than others. Being honest about your situation before you start will save you time, money, and frustration.
Our team is here to help you plan. Before you buy anything, contact us with your yard dimensions, photos if possible, and any questions about drainage, slope, or base prep. A 10-minute conversation can save you a full weekend of rework.
✅ Good For DIY
- Flat or gently sloping yard
- Simple rectangular or L-shaped area
- No major drainage concerns
- Access for equipment and materials
- Comfortable with physical outdoor work
- Time to do it right over a weekend or two
⚠️ Consider Getting Help
- Significant slope or drainage issues
- Multiple complex angles or curves
- Large area requiring multiple seams
- Existing hardscape to work around
- Tight timelines or large commercial space
- Unsure about base preparation requirements
Ready To Start Your Project?
Tell Us About Your Install — We’ll Help You Plan It.
Whether you’re ready to order or still figuring out your plan, our team is here to help. Share your project details and we’ll come back with product recommendations, quantity estimates, and answers to any questions you have — no obligation.
- Free material quantity estimate based on your square footage
-
Product recommendation for your specific use case and
conditions - Infill and accessories guidance so you buy right first time
- Option to visit the showroom and feel products in person
-
No pressure — just practical help from a
turf supplier -
Same-day pickup or job-site delivery across
Plan My DIY Install
We respond within one business day.
What You’ll Need
Tools & Materials For A DIY Artificial Turf InstallHaving the right materials before you start is one of the most important parts of a
successful install. Premium Grass Blades stocks everything you need — available for
pickup at our Maple Ridge warehouse or delivery across
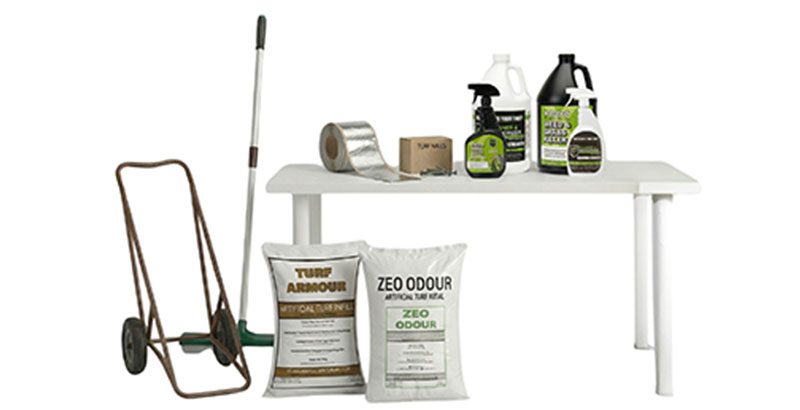
📦 Materials You’ll Need To Buy
- Artificial turf — measure your area and add 10–15% for waste and trimming. PGB Supplies
-
Crushed gravel base (3/4″ minus or road base) — typically 3–4 inches deep for
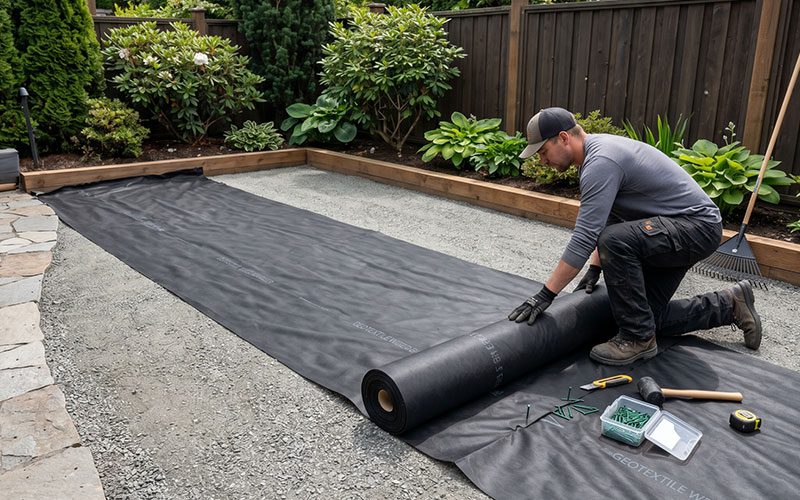
drainage. Source locally. - Weed barrier / landscape fabric — prevents organic growth pushing through. PGB Supplies
- Infill (silica sand, Zeo Odour, or Turf Armor) — depends on your turf type and use case. PGB Supplies
- Turf nails or staples — secure perimeter and seams. PGB Supplies
- Seaming tape — self-adhesive, used where turf pieces join. PGB Supplies
- Bender board or edging — creates a clean border and holds the turf perimeter.
🔧 Tools You’ll Need To Have Or Rent
- Plate compactor — essential for compacting the gravel base. Rent from a local equipment yard.
- Utility knife / turf cutter — for trimming the turf to shape. Keep blades sharp.
- Straight edge or chalk line — helps you cut clean, straight edges.
- Hammer or nail gun — for driving perimeter nails.
- Rake and wheelbarrow — for moving and levelling the base material.
- Power broom or stiff brush — for standing up fibres and working in infill after install. PGB supplies
- Tape measure — measure twice, cut once.
Not sure what infill to use? The right infill depends on your turf product and how you’re using the space. Ask our team before you order and we’ll match you with the right product for your project.
Step-By-Step Installation
How To Install Artificial Turf — AFollow these steps in order. The base preparation stages (Steps 1–3) are the most important — they determine how your turf performs and how long it lasts. Don’t rush them.
1
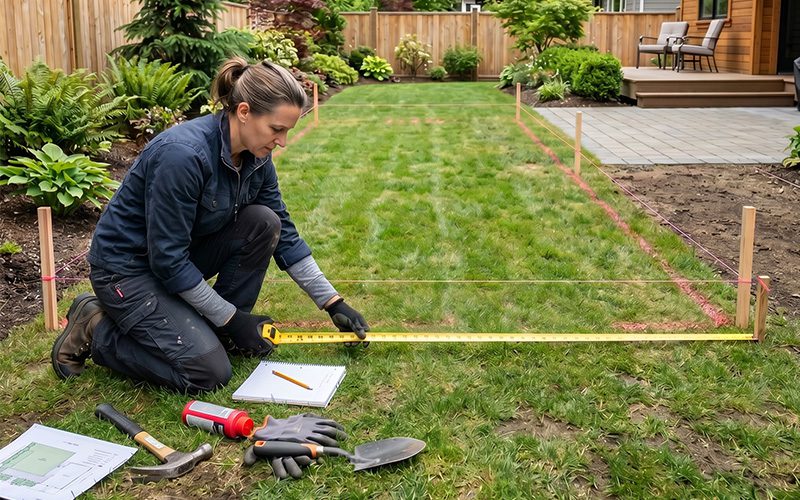
Mark Out And Measure Your Area
Before anything else, define the exact area you’re turfing. Use stakes and string lines to mark the perimeter clearly. Take careful measurements — length, width, and note any irregular shapes or features like garden beds, trees, or posts.
-
Measure total square footage and add 10–15% for trimming waste
-
Note the direction of natural light — lay turf fibres facing toward the main viewing angle
-
Check your slope — a slight fall away from the house (1–2%) improves drainage
-
Photograph the area before you start — useful for planning and problem-solving later
PGB Tip: Send us your measurements and a photo before you order. We can confirm your turf quantity and help you plan your layout to minimise seams.
2
Remove Existing Grass And Vegetation
The existing lawn, weeds, and organic material need to come out completely. Any organic matter left behind will decompose, create soft spots, and allow weeds to push through over time.
-
Remove grass and topsoil to a depth of approximately 3–4 inches
-
Remove roots and organic debris as thoroughly as possible
-
For larger areas, consider hiring a sod cutter or mini-excavator
-
Check the soil condition once exposed — soft, unstable areas may need additional work
PGB Tip: In
⚠️ Call
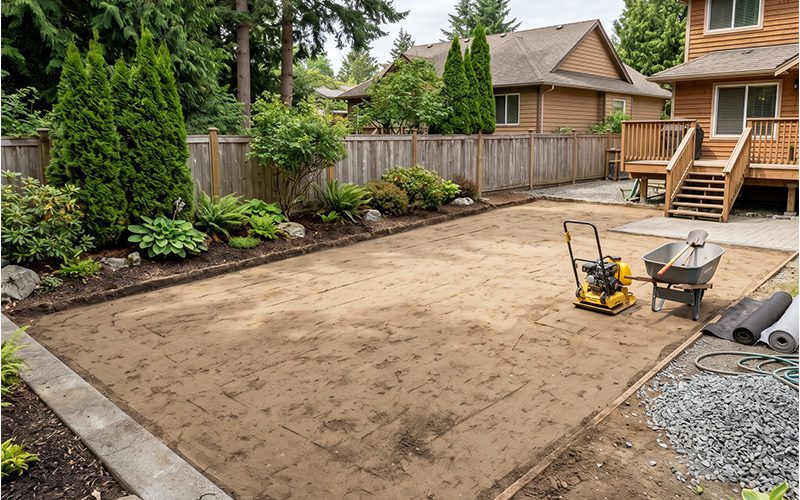
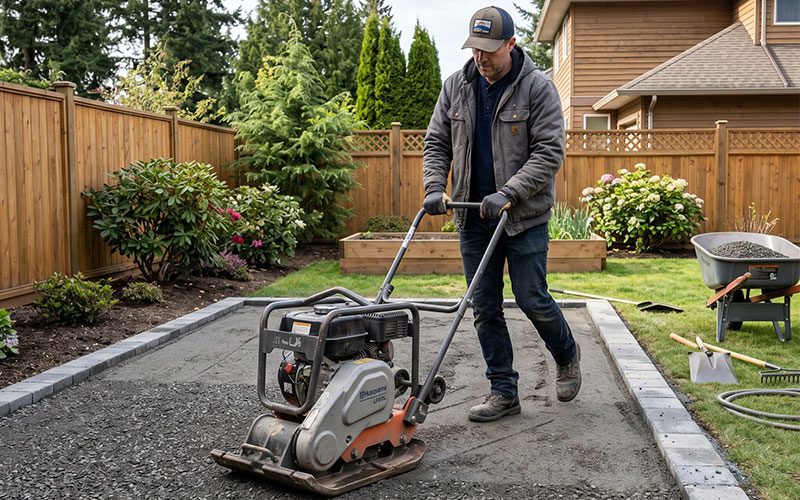
3
Install And Compact The Gravel Base
This is the foundation of your entire install — and it’s where DIY installs most often succeed or fail. A properly compacted gravel base provides drainage, stability, and prevents the turf from shifting or developing soft spots.
-
Spread 3–4 inches of 3/4″ minus crushed gravel (road base) evenly
-
Grade the surface to ensure water drains away from structures — aim for 1–2% slope
-
Compact thoroughly with a plate compactor — at least 2–3 passes in different directions
-
Finished base should feel firm underfoot with no give
PGB Tip: Renting a plate compactor is non-negotiable for a lasting result. Hand-tamping a large area is not sufficient.
4
Lay The Weed Barrier
Once the base is compacted and level, lay a quality weed barrier across the entire area. This prevents any remaining seeds or roots from germinating and pushing through the turf surface over time.
-
Unroll the weed barrier and overlap seams by at least 6 inches
-
Pin the barrier in place temporarily
-
Trim neatly around obstacles and the perimeter
-
Use a commercial-grade barrier — thin consumer products break down faster under
‘s wet conditions
PGB Tip: We stock heavy-duty 15 ft wide weed barrier — wide enough to cover most yard areas in one or two strips.
5
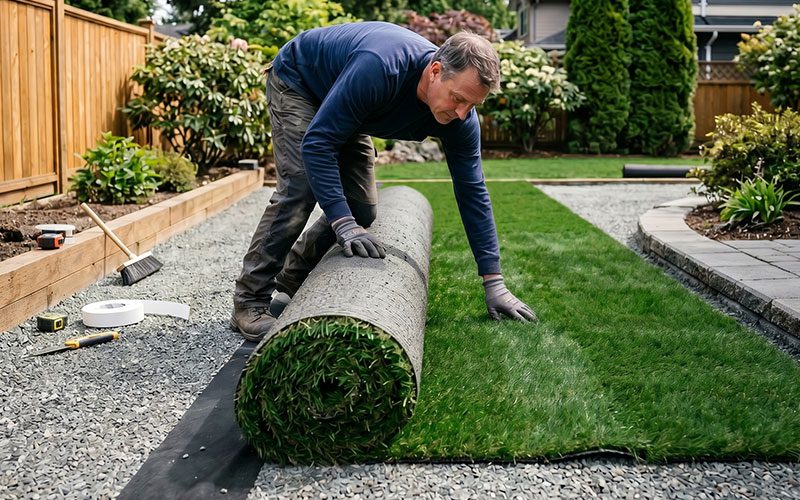
Roll Out And Position The Turf
Roll out your turf across the prepared base, taking care with the direction of the pile and the position of any seams.
-
All pieces should run in the same direction — check pile direction across all sections
-
Let the turf relax for 1–2 hours in warmer weather — it will flatten and be easier to work with
-
Position seams away from high-traffic areas and sight lines where possible
-
Leave extra material at the edges — trim to final size after positioning
PGB Tip: Our 15 ft wide rolls reduce the number of seams needed for most standard backyards — ask us about roll widths when you order.
6
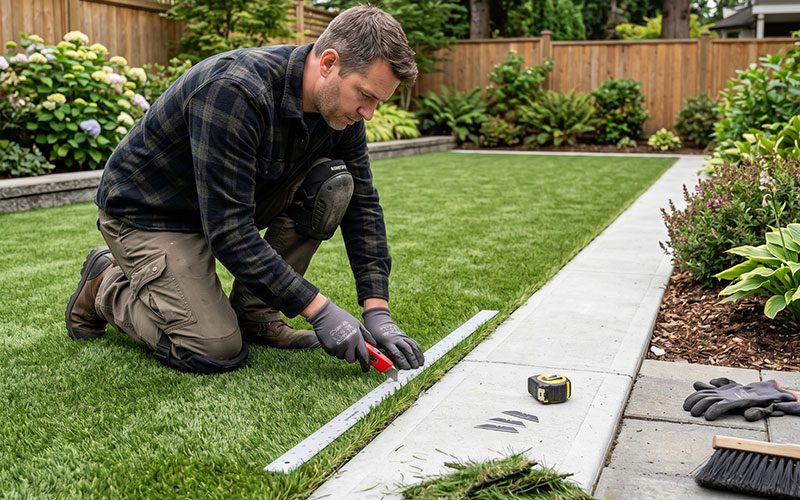
Cut And Trim To Shape
With the turf positioned, cut it to its final shape. Careful cutting is what separates a professional-looking result from an amateur one.
-
Use a sharp utility knife and cut from the backing side — never from the top
-
Use a straight edge or chalk line for any straight cuts along borders
-
For curves, cut gradually — you can always remove more material but can’t add it back
-
Cut along the rows of stitching where possible — this hides the cut edge better
-
Change blades regularly — a dull blade drags and creates ragged edges
PGB Tip: Before cutting your final edges, double-check positioning one more time. Once cut, there’s no going back.
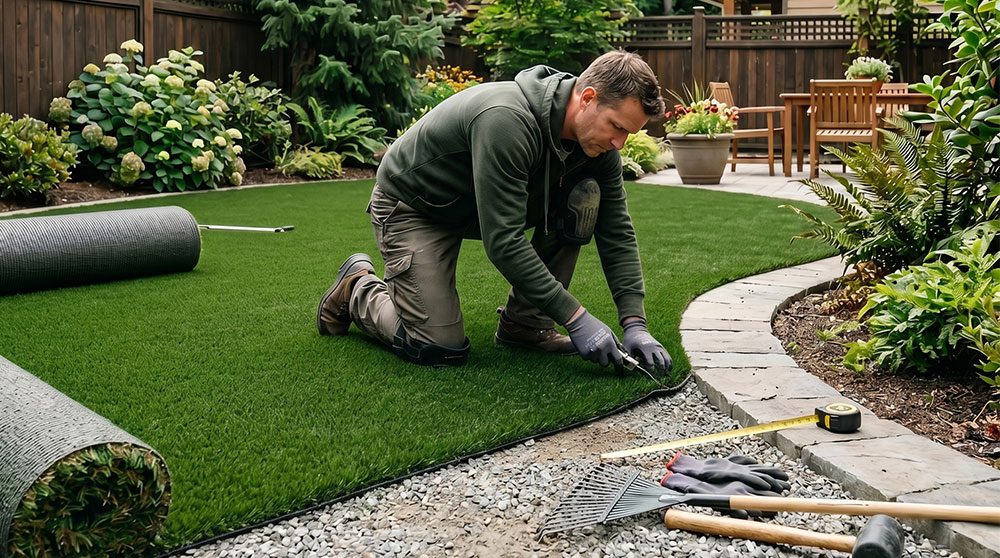
7
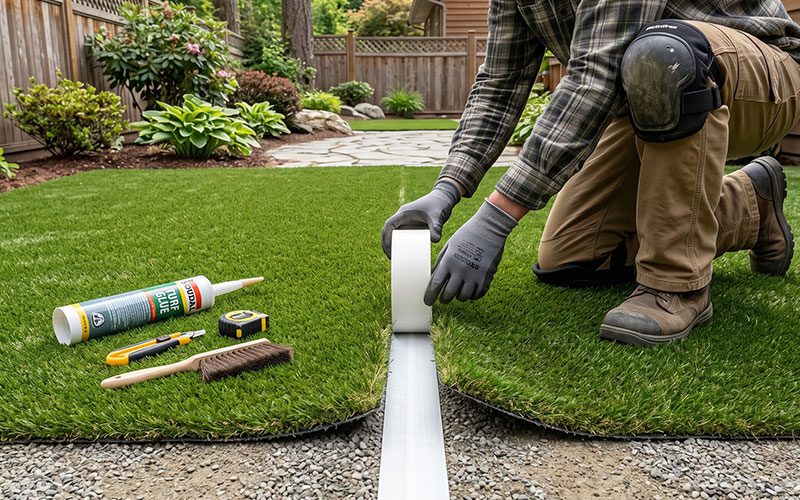
Join Seams (If Applicable)
If your project requires more than one piece of turf, seaming is the most skill-sensitive part of a DIY install. Done well, seams are virtually invisible.
-
Trim both edges along the same row of stitching so the seam sits cleanly
-
Lay self-adhesive seaming tape face-up under the seam, centred between the two edges
-
Press both edges firmly onto the tape — work from the centre outward
-
Check that pile direction matches on both sides before pressing down
-
Apply weight along the seam and allow to set before moving on
⚠️ Seaming is the hardest part of a DIY install. If your project has multiple seams in visible areas, contact us — we can advise on technique or connect you with an experienced installer in your area.
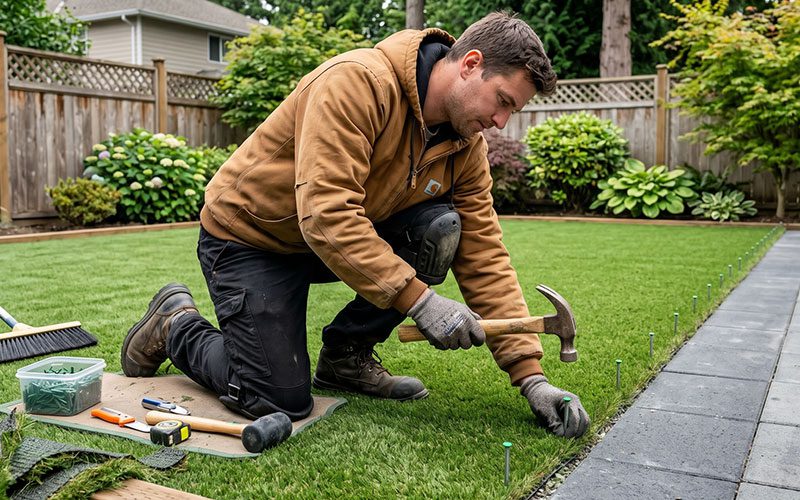
8
Secure The Perimeter And Edges
Once the turf is cut and seamed, secure the perimeter so it can’t lift, shift, or peel back over time.
-
Nail or staple the perimeter every 6–8 inches using 6-inch turf nails or landscape staples
-
Drive nails at a slight inward angle for better holding power
-
For edges against concrete or pavers, use construction adhesive as an alternative
-
Fold the edge under neatly for a clean finished look
-
Add bender board or edging along any open lawn border for a defined, professional finish
PGB Tip: We stock 6-inch turf nails individually and by the box — match nail density to expected foot traffic.
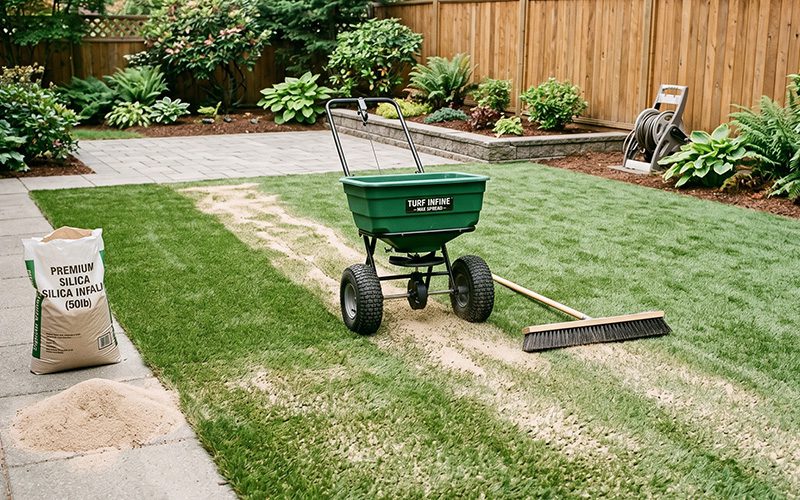
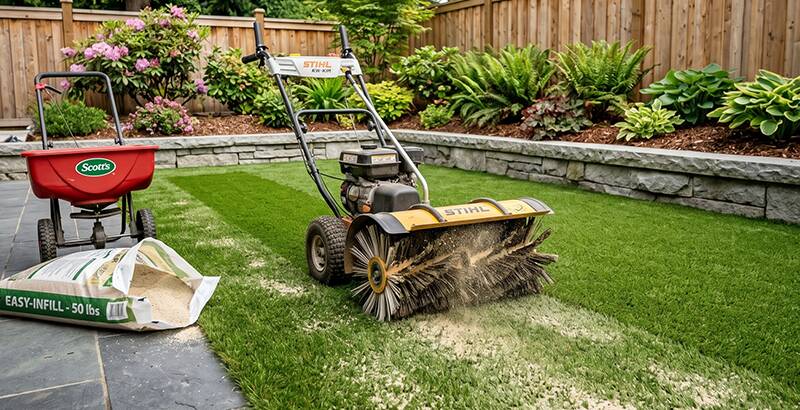
9
Apply Infill
Infill is spread across the turf surface and brushed down into the pile. It stabilises the fibres, adds weight, supports drainage, and — depending on the type — helps with odour control in pet areas.
-
Apply infill evenly using a spreader or by hand in smaller areas
-
Work in sections — spread a manageable area, then brush before moving on
-
Use a power broom or stiff brush to work infill down into the pile
-
Apply the quantity recommended for your specific turf product
-
For pet areas, Zeo Odour infill provides cooling and natural odour control
PGB Tip: Give us your square footage and turf product and we’ll calculate the right infill quantity for you.
10
Final Brushing And Inspection
The final step is grooming the turf to stand the fibres upright and inspect the finished installation before you call it done.
-
Brush the entire surface against the pile direction to lift and separate the fibres
-
Check all seams are flat and invisible at eye level
-
Check all edges are secure — give perimeter areas a gentle tug test
-
Look across the surface at a low angle in the sun — this reveals any unevenness in the base
-
Water the surface lightly to settle the infill and cool the fibres
PGB Tip: The Garland power broom is the most efficient tool for the final grooming pass — we stock the 141E and 502E models in-store.
1–2
Weekends for most
15yr
Product warranty on all PGB turf
500+
Free
Planning support from our team
What You’ll Need From PGB
Everything For Your DIY Install — In Stock In Maple RidgePremium Grass Blades stocks all the materials you need for a complete DIY artificial turf installation. Pick up from our Maple Ridge warehouse or arrange delivery across
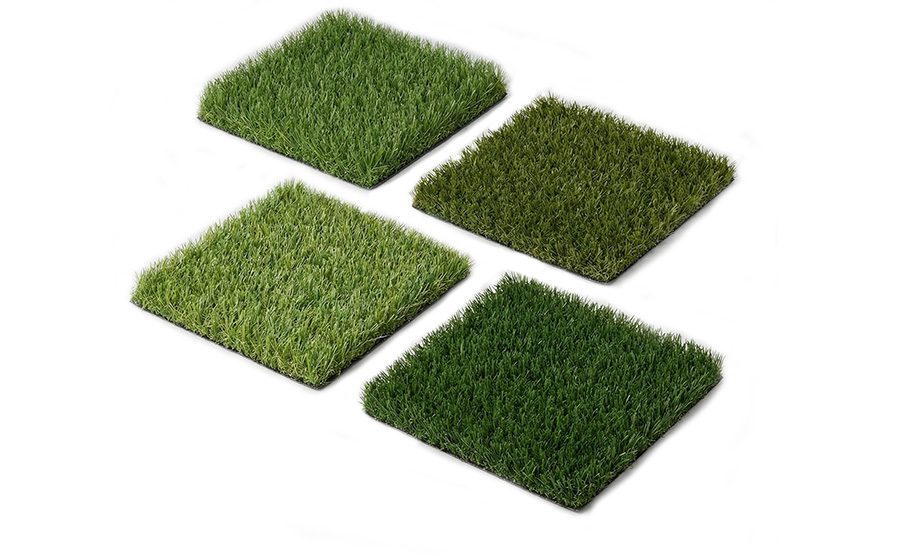
Landscape Turf
Available in 7.5 ft and 15 ft wide rolls. Multiple pile heights and densities for every use case.
Installation Accessories
Seaming tape, 6-inch turf nails, staples, heavy-duty 15 ft wide weed barrier, and construction adhesive. Everything for a secure, long-lasting install.
Infill & Grooming Tools
Silica sand, Zeo Odour (pet areas), and Turf Armor (high traffic). Garland power brooms and turf dollies for a professional finish.
Not sure what to order? Share your square footage, turf choice, and project details with our team before you buy. We’ll confirm your material quantities, recommend the right infill, and make sure you don’t show up short or over-order.
DIY Questions
Frequently Asked QuestionsThe most common questions
Most residential backyard installs — say 400–800 sq ft — take a motivated homeowner one to two weekends. The base preparation is the most time-consuming phase. Smaller, simpler areas can be done in a single day.
In most
It's not recommended, especially in
Measure your area in square feet (length × width) and add 10–15% for trimming waste. For irregular shapes, break into rectangles and add together. Contact us with your dimensions and we'll confirm the right quantity.
It depends on your use case. For a general lawn, our Cedar and Forest Green Elite lines are popular. For pet areas, Evergreen with Zeo Odour infill is the top recommendation. For shaded yards, Westcoast Hemlock's shorter pile is easier to maintain. Visit our showroom or contact us and we'll help you choose.
A gentle slope (1–2%) is actually ideal — it directs water away from structures naturally. Steeper slopes require more careful base preparation. If you have a significant slope, contact us before you start.
Yes. Turf can be installed directly over concrete, pavers, or a wood deck — no gravel base is required on a hard surface. Use construction adhesive or perimeter nailing to secure the edges.
Very little. Occasional brushing to keep fibres upright, removing debris, and rinsing pet areas is typically all that's needed. For a more thorough seasonal clean, we offer turf cleaning and renewal services.
Absolutely. Call us on (604) 757-2899 or visit the showroom during business hours and our team will help you work through whatever you're facing — seaming, drainage, material issues. We want your install to go well.
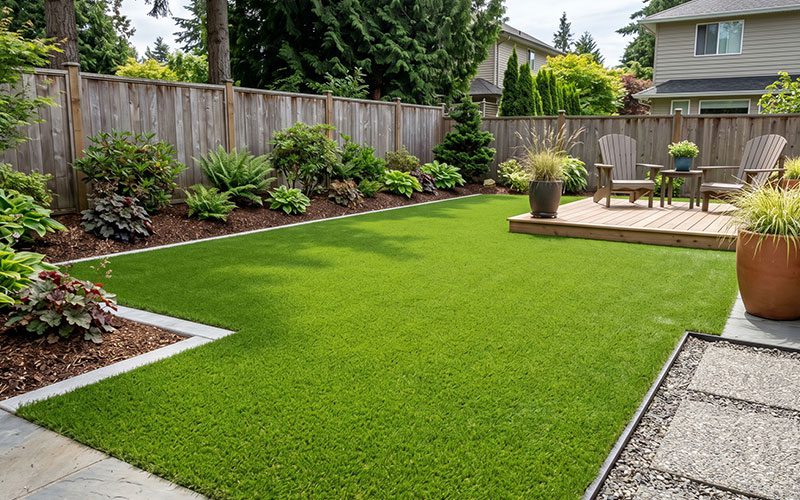
You’ve Got This – And We’ve Got You
Your DIY Install Starts With The Right Materials And A Solid Plan.Premium Grass Blades has been helping
Visit our Maple Ridge showroom to see every turf product in person, request a formal written quote online, or call our team to discuss your strata project in detail.