INSTALLATION GUIDE
FOR PREMIUM GRASS BLADES
Engineered for Durability & Drainage in Western Canada
Think of your turf like a fine wine – install it right, and it only gets better with age
Welcome to PGB Professional-Grade
Turf Installation
Collaboration Is the Cornerstone of PGB’s Installation Philosophy.
At Premium Grass Blades, we empower landscapers and contractors to achieve flawless, long-lasting turf installations – no matter the scale.
From private backyards to commercial rooftops, our patented BladeFlow™ fibers and PGB-certified installation practices guarantee a uniform finish that stands up to BC’s climate.
Think of us like your turf-installation GPS – point us toward your next project, and we’ll guide you every step of the way.
WHY PGB’S PROPER INSTALLATION MATTERS
A Well-Installed Premium Grass Blades System Provides:
Proper installation ensures durability in BC’s rainy season and prevents pooling.

")
")
Tools & Materials
A detailed list of all the essential tools and materials you’ll need for a smooth, efficient, and successful turf installation
Step-by-Step Instructions
Clear, step-by-step instructions covering every phase of your installation—from prep work through finishing touches.
Pro Tips & Troubleshooting
Expert advice and troubleshooting solutions for common installation challenges, ensuring confidence every step of the way.
Who This Guide
Is For
Landscapers: Elevate your service with professional turf installations.
Contractors: Simplify large-scale installations with efficient processes.
DIY Enthusiasts: Gain the knowledge needed for a professional-grade finish.
Essential Equipment
Must-Have Tools for a Professional Artificial Turf Installation
")


DRAINAGE
SOLUTIONS
Which One is Right for You?
Proper drainage ensures the longevity and performance of artificial turf installations. It prevents water pooling, protects against odours, and maintains the stability of the sub-base.
Choosing the proper drainage system depends on the installation’s location, climate, and intended use.


SEAMING
What is Seaming?
Seaming is the process of joining two or more pieces of artificial turf together to create a seamless, uniform surface.
It’s a critical step in turf installation that ensures structural integrity, aesthetic continuity, and long-term durability.
Purpose of Seaming
- Creates a Large, Unified Surface: Turf rolls are typically manufactured in fixed widths (e.g., 12 or 15 feet), so seaming is essential to cover larger areas like lawns, sports fields, or commercial landscapes.
- Maintains Aesthetic Consistency: Properly executed seams are virtually invisible and maintain the natural look of the synthetic grass by aligning fiber direction and pile height.
- Supports Structural Stability: High-quality seams prevent shifting, lifting, or gapping over time, especially under foot traffic or weather changes.
")

MEASURE THE AREA
- Use a tape measure to calculate the total square footage.
- Add 5% extra for cutting and adjustments.
EXCAVATE THE SITE
- Ensure the base is level and free of rocks, roots, and other obstructions.
- Depending on the drainage layer used, remove 4-10 inches of grass, soil, or debris with a turf cutter, shovel, or pickaxe.
")
BASE PREPARATION
02

ADD BASE MATERIAL
Depending on the chosen drainage type, evenly spread the material to create a compact, stable base for proper drainage and prevent uneven settling.
LEVEL AND COMPACT
- Use a landscape rake to level the base material.
- Lightly moisten the aggregate and compact it in 2–3 inch increments using a plate compactor. Avoid overwatering to prevent a sponge effect.

CHECK FOR PROPER DRAINAGE
Ensure the base slopes slightly (1–2%) away from structures for adequate water runoff.

SMOOTH THE SURFACE
For two or three-layer drainage systems, finish with a layer of crusher fines to create a flat, smooth base. This supports the turf and ensures long-term stability.
Compaction Tips
Lightly moisten the aggregate between compactor passes, avoiding excess water to prevent a sponge effect. Compact in 2-3 inch layers, finishing with crusher fines for a smooth, stable base that supports Premium Grass Blades turf.
03
WEED PREVENTION LAYER
BENEFITS OF USING A WEED BARRIER
Prevents Weed Growth
Install the weed barrier between the crusher fines and turf backing for effective weed prevention.
Enhances Stability
Provides additional support to the base material.
Reduces Noise
Damps the sound of base material crunching against the turf backing.
Prolong Turf Lifespan
Helps maintain a clean and stable surface beneath the turf.

WHEN NOT TO USE A WEED BARRIER
- Pet Areas: Weed barriers can trap urine, leading to odours. Instead, ensure proper compaction of the base material for drainage.
- High-Drainage Requirements: A weed barrier may slow water infiltration in areas with heavy rainfall or poor natural drainage
TIPS FOR INSTALLATION
For extra durability, use PGB’s non-woven landscape cloth, overlapping edges by 3-6 inches. Smooth out wrinkles to prevent uneven turf installation.
Add a double weed barrier to reduce noise and enhance protection for putting greens.

COMMON MISTAKES TO AVOID
- Using a Barrier in Pet Areas: Traps urine, causing unpleasant odours.
- Insufficient Overlap: Can allow weeds to grow through seams.
- Poor-Quality Fabric: Thin or cheap materials can degrade quickly and compromise effectiveness.
Pro Tip
Wildlife Protection: Use wire mesh to protect turf installations from moles and other wildlife.
LAYERING THE TURF
04
ALIGNING AND LAYING THE TURF
Ensure the turf looks natural and seamless by properly aligning the blade direction and positioning the rolls.
ALIGN TURF GRAIN
Inspect the turf to identify the pile direction (blade lean).
")
Front yards
Orient blades towards the street.
")
Backyards
Orient blades towards the house or primary viewing area.
POSITION TURF ROLLS
- Ensure gutters do not drain directly onto turf areas.
- Check for windows or any reflective surface that could magnify heat onto the turf and cause damage.
- Begin in a corner or along a straight edge to ensure uniform alignment across the area.
- Allow the rolls to acclimatize in a warm environment before installation. In colder climates, this step makes the turf more pliable and easier to work with.


MINIMIZE VISIBLE SEAMS
- Avoid head seams (longitudinal joins) as they are harder to conceal.
- Use side seams (lateral joins), which are easier to blend as turf blades naturally cover the join.
- Maintain proper seam spacing to prevent a “mohawk” effect.
LAY THE TURF
- Roll out each section of turf, aligning edges carefully to maintain a seamless appearance.
- Overlap edges slightly for precise trimming later.

05
Cutting to Fit
PRECISION CUTTING AND TRIMMING
Achieving clean, professional edges when cutting artificial turf requires careful technique and the right tools. Use a sharp utility knife, refreshed with a new blade every 10–12 uses, to ensure precise cuts without fraying.
CUTTING ALONG WALLS AND FENCES
- Gently pull the turf taut and press it against the base of the wall or fence.
- Position the utility knife on the turf backing closest to the obstacle.
- Make small, incremental cuts (3–4 inches at a time), ensuring the turf stays snugly positioned.
-
Periodically lay the turf flat to check alignment, leaving a slight gap of no more than 1/8–2/8 inch from the edge for a flawless finish.


TRIMMING AROUND CORNERS, TREES, OR POSTS
- Make relief cuts from the backing outward to remove excess material and ease the process.
- Regularly check for proper alignment and smooth transitions between sections.
RECESS FROM WALKWAYS
Slightly recess the turf from walkways for a smooth transition between surfaces.
TURF RIBBON REMOVAL
Always remove the ribbon from the edge of the turf.
Pro Tip
Keep blades sharp for clean edges; dull blades can fray turf. Trim precisely, allowing no more than 2/8 inch from the edge for a seamless, durable, and polished look.
Securing and Fluffing your Turf
06
SECURING THE TURF
Once the turf is properly trimmed, secure it to the base to prevent movement and ensure a long-lasting installation.

INSERTING SPIKES
- Insert spikes or landscape staples every 6 inches along the perimeter for stability.
- Maintain a distance of approximately 2 inches from the turf’s edge to avoid fraying or uneven edges.
- Use one spike per square foot for optimal turf security.
- Then, secure the turf by placing spikes in rows up and down the turf for added reinforcement.
HAMMERING TECHNIQUES
- Use gentle, even force when hammering spikes to avoid creating depressions in the turf.
- Ensure the nail or staple heads are flush with the backing without compressing the turf.
- Do not hammer nails into cold or hard ground to prevent damage or diverts.

Pro Tip
Before hammering spikes, pull the blades away to prevent trapping them under the head. This keeps the turf upright, smooth, and stable for a polished, professional finish.
07
Brushing Up
BRUSHING UP THE TURF
Groom regularly for a polished look and lasting performance.
TOOLS FOR BRUSHING
- PGB’s Turf Rake: Nylon tines lift and refresh blades, making turf maintenance easier than bristle brooms.
- Power Broom: Motorized bristles lift turf blades evenly, which is ideal for large installations.


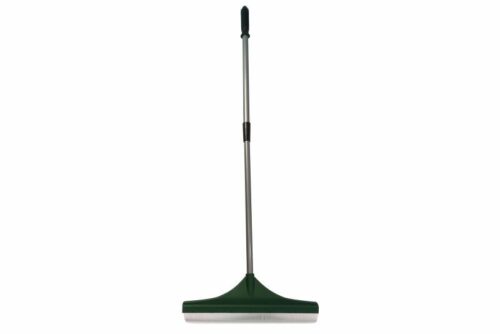

BRUSHING TECHNIQUES
- Brush against the pile direction to lift blades and maintain an upright position.
- Use steady, even pressure when brushing to protect the turf backing and prevent shifting the base material. Avoid over-brushing seams to maintain a natural look and prevent separation.
Adding Infill
08
STABILIZING TURF WITH INFILL
Once the turf is properly trimmed, secure it to the base to prevent movement and ensure a long-lasting installation.
STEP 1: PREPARING FOR INFILL
Proper Preparation Ensures Effective Infill Application:
- Ensure Turf and Infill Are Dry: Moisture causes clumping and uneven distribution.
- Brush Blades Upright: Use a power broom or stiff-bristled brush to lift and separate the turf fibres.


STEP 2: APPLYING THE INFILL
- Safety Precaution: Wear a face mask to avoid inhaling fine particles.
- Even Distribution: Spread in small sections to avoid clumps and ensure consistency.
- Application Tools: Use a seeder, spreader, or holed bucket for even distribution.
Recommended Application Rates:
- Check Infill Requirements: Check infill requirements: Refer to the catalogue for recommended application rates per square foot.
STEP 3: WORK THE INFILL INTO THE TURF
- You can use a power broom or stiff rake to work the infill between the turf fibres. This helps distribute the weight evenly, stabilizing the turf and preventing movement.
- Repeat this step until the infill is no longer visible on the surface.

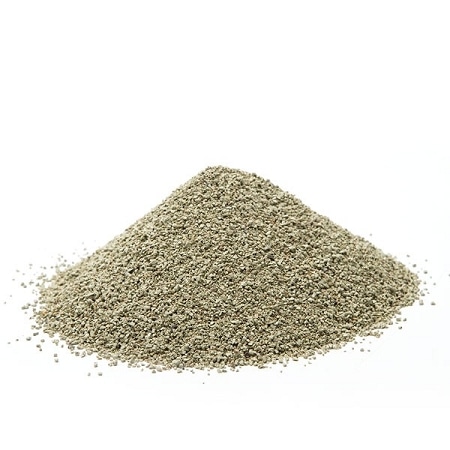
CHOOSING THE RIGHT INFILL
(Combine different infills for cooling, deodorizing, and cost savings.)
1. Silica Sand:
Recommended For: General use, including residential lawns, putting greens, and commercial spaces.
Benefits: Cost-effective, adds weight, and supports blades for durability.
2. Zeolite Sand (ZeoOdour):
Recommended For: Pet areas or spaces where children may come into direct contact with the infill.
Benefits:
- Neutralizes ammonia from pet urine to reduce odours.
- Keeps turf cooler during hot months.
- Eco-friendly and safe for children and pets.