1. Remove Existing Synthetic Grass
Using a shovel or turf cutter, remove all existing turf. Dig the soil out to a depth of approximately 4-6 inches; flatten the soil as much as possible, this will make the next steps easier.


2. Apply a Drainage Layer
The success and longevity of your Premium Grass Blades will be heavily based on a good drainage system. Once the turf has been removed and the soil flattened, we recommend you pour about 2-4 inches of road base aggregate to bring the grade back up. You will want the top layer lower than grade, as the turf itself sits 1.5-2 inch. So you will want the base recessed down from grade. Compact the ground using a compactor to create a solid base, you can achieve this by spraying the area lightly with water in between each sweep with the compactor. Take care not to over soak the area, if the aggregate gets too wet it creates a sponge effect were it will swell to a higher level than it actually is. If applying a total of 4-5 inches compact in layers, so every 2-3 inches. It also a good idea to apply a thin layer of crusher fines on top of the road base aggregate to make sure the top layer is smooth and flat. This layer will provide you with a firm, well-draining surface that will support your Premium Grass Blades artificial synthetic grass. It there are any imperfections in the base, it could show through one the turf.
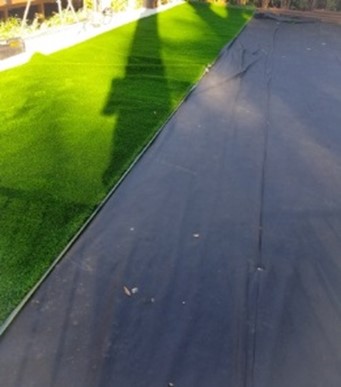
3. Lay Down Landscape Material
In order to prevent weeds from growing up through the turf, a layer of weed-suppressing material should be spread out over your lawn space and cut to shape to reach all corners and edges. We recommend that you use staples to secure the material making sure it lays nice and flat underneath your synthetic turf. Use 2-3 oz landscape cloth, but double it up over the entire area. Make sure the overlaps are even and there are no high points. The doubling of the landscape cloth is important as it not only stops weeds, but it also muffles the sound of the roadbase “crunch” against the backing of turf. Premium Grass Blades stocks industrial-strength landscape weed barrier in 12 & 13 ft wide rolls for easy convenience.

4. Pile Direction & Line up the Synthetic Grass
To minimize the shine of the turf, one must be mindful of how the turf blades lay, prior to laying out the turf. Premium Grass Blades turf has a pile direction just like all turfs, which means that the blades bend slightly in a single direction. Your grass will look the most natural and most attractive when your vantage point is on the side towards which the blades bend. This means that you will generally want the pile direction of your turf to point towards your most-used outdoor area or your house. When installing a front lawn between a house and a street, the grain is often positioned to face the street. When installing an artificial lawn in a backyard, the pile direction is generally towards the house or outdoor living areas. This may sound a little confusing on paper, but it is easy to see the grain and determine the preferred direction when you are looking at your Premium Grass Blade’s turf prior to installation. When laying your turf out, line up your roll of synthetic grass to a corner or straight edge if possible. If laying out multiple pieces of synthetic grass it is imperative that all of the gauges run in the same direction. installing artificial turf from premium grass blades The gauge or stitch rows of the backing Push the synthetic grass tight into the corners. Cut the excess if required, but leave 6-10 inches for the final cut. Cut along the back using a utility knife, use a level as a guide if you do not have brick edge to work from.
5. Spike Synthetic Grass Into Place
Once the synthetic grass is cut to fit, start securing by inserting a few spikes every few feet to hold the grass in place, this will assure less movement of the synthetic grass when. If no seaming is required, then insert spikes every 12-16 inches, continue on in rows with staples/spikes. Be sure to spike the perimeter of the turf about 2-5 inches from the edges. Do not hammer down the spikes or staples to hard where they will create a divet. Also, make sure the head of the nail or staple does not pin down the blades of turf when hammering down. Tweeze the blades of turf away from the head of the nail so they do not get caught under it, enabling the head of the nail to be visible from above (Click here to get details on Premium Grass Blades Spikes & Staples)


6. Seaming your Synthetic Grass (If Required)
To help disguise the seam it is extremely important to cut the entire edge of both pieces in length, as well as keep the gap exactly the same size along the seam. This decreases the likelihood of the seam being visible. We recommend only using Premium Grass Blades Self-Adhesive Seaming tape for DIY, as it is much more manageable than using open glue. Each piece will be cut a bit differently. You will want to cut one piece, two to three gauges in, with the cut directly at the beginning of the gauge; while the other piece is to be cut two to three gauges in with the cut directly at the end of the gauge. This will create an overlapping effect that will make it easier to marry the two together, as well as help with disguising the seam. It will also keep the space between each gauge exactly the same. seaming artificial turf from premium grass blades synthetic turf Once the cuts are made you will want to take the side that has its edges secured to your border and insert stakes every three to five feet, one foot inward away from the seam. Now take the other piece, pull it close enough so that your edges match up and there are no gaps in between. Once satisfied with your seam line repeat steps to stake in the second piece. Every three to five-foot, one foot inward away from the centre seam.
DO NOT completely sink the stakes in the ground, as you may need to pull them out later. Fold the grass back away from the center seam on each side, If needed, put an item on top of the folded section to keep it from folding back down. installing artificial turf seaming tape from premium grass blades Lay out a piece of seaming tape, and secure it down to the ground with stakes at each end. Remove the non-adhesive side and slowly join the two pieces together. We recommend doing this step a little bit at a time to make sure the alignment is perfect. Doing a little bit at a time also helps you to make sure the blades or thatch are not curling inwards and sticking onto the tape. Do this in a zipper motion; this part is much easier with two people. Once two sides are secure with tape use the staples along the seam line to help keep the seamed grass in place. Then proceed to pull tight and spike in the rest of the outer edges of the synthetic grass. Either hammer in the stakes which were sticking out or pull them out and use staples.

7. Brush up the Turf
Use a power broom or turf rake to brush up the Premium Grass Blades turf blades. Brush up in the opposite direction of the pile direction. For beginners we recommend purchasing Premium Grass Blades Turf Rake. The Nylon tynes will reach deep down to lift the flattened turf blades.This will make brushing up the turf and maintenance of the turf much easier than bristle broom.
8. Apply a Layer of Sand
Once the blades are brushed up, apply a thin layer of silica sand directly to the lawn surface, spread evenly to ensure full coverage. This will help weigh down the grass to deter movement or sliding, as well as keep the blades upright. It also protects against UV deteriorate. Make sure the turf is completely dry and that there is no moisture in the sand, or it will clump together. A turf rake or power broom will make this task much easier. The suggested amount of regular silica sand is 1-2 lbs. per square foot for Premium Grass Blades artificial synthetic grass and 2-3 lbs. per square foot of putting green silica sand for Premium Grass Blades Putting Greens.


If you have pets we recommend Zeolite sand that is made to absorb odours and help cool the turf in summer months. We definitely recommend the use of Premium Grass Blades ZeoOdour Zeolite turf sand with pets or when infill comes in direct contact with young children.
From more information regarding our turf please contact us at Info@PremiumGrassBlades.com
1. Remove Existing Synthetic Grass
Using a shovel or turf cutter, remove all existing turf. Dig the soil out to a depth of approximately 4-6 inches; flatten the soil as much as possible, this will make the next steps easier.
2. Apply a Drainage Layer
The success and longevity of your Premium Grass Blades will be heavily based on a good drainage system. Once the turf has been removed and the soil flattened, we recommend you pour about 2-4 inches of road base aggregate to bring the grade back up. You will want the top layer lower than grade, as the turf itself sits 1.5-2 inch. So you will want the base recessed down from grade. Compact the ground using a compactor to create a solid base, you can achieve this by spraying the area lightly with water in between each sweep with the compactor. Take care not to over soak the area, if the aggregate gets too wet it creates a sponge effect were it will swell to a higher level than it actually is. If applying a total of 4-5 inches compact in layers, so every 2-3 inches. It also a good idea to apply a thin layer of crusher fines on top of the road base aggregate to make sure the top layer is smooth and flat. This layer will provide you with a firm, well-draining surface that will support your Premium Grass Blades artificial synthetic grass. It there are any imperfections in the base, it could show through one the turf.
3. Lay Down Landscape Material
In order to prevent weeds from growing up through the turf, a layer of weed-suppressing material should be spread out over your lawn space and cut to shape to reach all corners and edges. We recommend that you use staples to secure the material making sure it lays nice and flat underneath your synthetic turf. Use 2-3 oz landscape cloth, but double it up over the entire area. Make sure the overlaps are even and there are no high points. The doubling of the landscape cloth is important as it not only stops weeds, but it also muffles the sound of the roadbase “crunch” against the backing of turf. Premium Grass Blades stocks industrial-strength landscape weed barrier in 12 & 13 ft wide rolls for easy convenience.
4. Pile Direction & Line up the Synthetic Grass
To minimize the shine of the turf, one must be mindful of how the turf blades lay, prior to laying out the turf. Premium Grass Blades turf has a pile direction just like all turfs, which means that the blades bend slightly in a single direction. Your grass will look the most natural and most attractive when your vantage point is on the side towards which the blades bend. This means that you will generally want the pile direction of your turf to point towards your most-used outdoor area or your house. When installing a front lawn between a house and a street, the grain is often positioned to face the street. When installing an artificial lawn in a backyard, the pile direction is generally towards the house or outdoor living areas. This may sound a little confusing on paper, but it is easy to see the grain and determine the preferred direction when you are looking at your Premium Grass Blade’s turf prior to installation. When laying your turf out, line up your roll of synthetic grass to a corner or straight edge if possible. If laying out multiple pieces of synthetic grass it is imperative that all of the gauges run in the same direction. installing artificial turf from premium grass blades The gauge or stitch rows of the backing Push the synthetic grass tight into the corners. Cut the excess if required, but leave 6-10 inches for the final cut. Cut along the back using a utility knife, use a level as a guide if you do not have brick edge to work from.
5. Spike Synthetic Grass Into Place
Once the synthetic grass is cut to fit, start securing by inserting a few spikes every few feet to hold the grass in place, this will assure less movement of the synthetic grass when. If no seaming is required, then insert spikes every 12-16 inches, continue on in rows with staples/spikes. Be sure to spike the perimeter of the turf about 2-5 inches from the edges. Do not hammer down the spikes or staples to hard where they will create a divet. Also, make sure the head of the nail or staple does not pin down the blades of turf when hammering down. Tweeze the blades of turf away from the head of the nail so they do not get caught under it, enabling the head of the nail to be visible from above (Click here to get details on Premium Grass Blades Spikes & Staples)
6. Seaming your Synthetic Grass (If Required)
To help disguise the seam it is extremely important to cut the entire edge of both pieces in length, as well as keep the gap exactly the same size along the seam. This decreases the likelihood of the seam being visible. We recommend only using Premium Grass Blades Self-Adhesive Seaming tape for DIY, as it is much more manageable than using open glue. Each piece will be cut a bit differently. You will want to cut one piece, two to three gauges in, with the cut directly at the beginning of the gauge; while the other piece is to be cut two to three gauges in with the cut directly at the end of the gauge. This will create an overlapping effect that will make it easier to marry the two together, as well as help with disguising the seam. It will also keep the space between each gauge exactly the same. seaming artificial turf from premium grass blades synthetic turf Once the cuts are made you will want to take the side that has its edges secured to your border and insert stakes every three to five feet, one foot inward away from the seam. Now take the other piece, pull it close enough so that your edges match up and there are no gaps in between. Once satisfied with your seam line repeat steps to stake in the second piece. Every three to five-foot, one foot inward away from the centre seam.
DO NOT completely sink the stakes in the ground, as you may need to pull them out later. Fold the grass back away from the center seam on each side, If needed, put an item on top of the folded section to keep it from folding back down. installing artificial turf seaming tape from premium grass blades Lay out a piece of seaming tape, and secure it down to the ground with stakes at each end. Remove the non-adhesive side and slowly join the two pieces together. We recommend doing this step a little bit at a time to make sure the alignment is perfect. Doing a little bit at a time also helps you to make sure the blades or thatch are not curling inwards and sticking onto the tape. Do this in a zipper motion; this part is much easier with two people. Once two sides are secure with tape use the staples along the seam line to help keep the seamed grass in place. Then proceed to pull tight and spike in the rest of the outer edges of the synthetic grass. Either hammer in the stakes which were sticking out or pull them out and use staples.
7. Brush up the Turf
Use a power broom or turf rake to brush up the Premium Grass Blades turf blades. Brush up in the opposite direction of the pile direction. For beginners we recommend purchasing Premium Grass Blades Turf Rake. The Nylon tynes will reach deep down to lift the flattened turf blades.This will make brushing up the turf and maintenance of the turf much easier than bristle broom.
8. Apply a Layer of Sand
Once the blades are brushed up, apply a thin layer of silica sand directly to the lawn surface, spread evenly to ensure full coverage. This will help weigh down the grass to deter movement or sliding, as well as keep the blades upright. It also protects against UV deteriorate. Make sure the turf is completely dry and that there is no moisture in the sand, or it will clump together. A turf rake or power broom will make this task much easier. The suggested amount of regular silica sand is 1-2 lbs. per square foot for Premium Grass Blades artificial synthetic grass and 2-3 lbs. per square foot of putting green silica sand for Premium Grass Blades Putting Greens.
If you have pets we recommend Zeolite sand that is made to absorb odours and help cool the turf in summer months. We definitely recommend the use of Premium Grass Blades ZeoOdour Zeolite turf sand with pets or when infill comes in direct contact with young children.
From more information regarding our turf please contact us at Info@PremiumGrassBlades.com